WordPress Development 101: Building Multilingual Websites
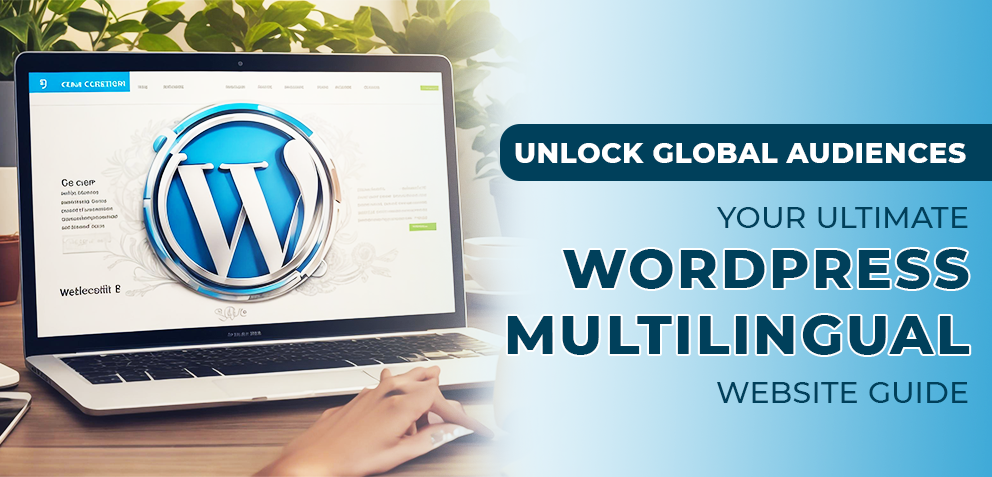
Table Of Contents
 Stay In-the-loop
Get fresh tech & marketing insights delivered right to your inbox.
Share this Article


Tags
Category
- .Net Developer
- Adtech
- Android App Development
- API
- App Store
- Artificial Intelligence
- Blockchain Development
- Chatbot Development
- CMS Development
- Cybersecurity
- Data Security
- Dedicated Developers
- Digital Marketing
- Ecommerce Development
- Edtech
- Fintech
- Flutter app development
- Full Stack Development
- Healthcare Tech
- Hybrid App Development
- iOS App Development
- IT Project Management
- JavaScript development
- Laravel Development
- Magento Development
- MEAN Stack Developer
- MERN Stack Developer
- Mobile App
- Mobile App Development
- Nodejs Development
- Progressive Web Application
- python development
- QA and testing
- Quality Engineering
- React Native
- SaaS
- SEO
- Shopify Development
- Software Development
- Software Outsourcing
- Staff Augmentation
- UI/UX Development
- Web analytics tools
- Wordpress Development
Greetings! In the vast online landscape, your WordPress website can say more than just “Hello.” Imagine it resonating with a global audience in Ciao, Hola, Bonjour, Hallo, and Hej. Don’t limit your message to one language; expand your reach and connect with diverse audiences. Well, building a multilingual website with WordPress development services may seem daunting, but fear not. With seasoned WordPress developers and experts, we guide you through seamlessly integrating multiple languages.
This isn’t just about translation plugins; it’s about creating an immersive digital experience for a global audience. It’s time to elevate your online presence, break free from linguistic limitations, and open the doors to a world of business opportunities that transcend borders.
Stay tuned for a comprehensive guide that turns your WordPress website into a multilingual masterpiece. The world is ready to hear your message in every language – let’s make it happen!
The Business Advantages of Multilingual WordPress Development
Why is having a multilingual WordPress website crucial? Here we have deciphered the reasons.
- Enriched User Experience
Multilingual websites enrich user experiences, boosting satisfaction, extending time spent on the site, and minimizing bounce rates. This not only enhances your conversion rate but also ensures a seamless and engaging interaction with diverse audiences.
- Wider Audience Reach
Did you know? 76% of online buyers are more likely to make a purchase when information is presented in their native language. A multilingual website not only enhances customer service but also caters to both domestic and international clients.
In the USA, where Spanish ranks as the 2nd most spoken language, embracing multilingualism is crucial for expanding your business reach.
- Improved Conversion Rate
According to CSA’s ‘Can’t Read, Won’t Buy – B2C‘ report, 72.1% of users prefer spending time on websites in their native language. Failing to provide content in their language may lead foreign customers to leave, significantly impacting your site’s conversion rate.
Implementing a robust multilingual feature not only retains customers but also instills confidence in making purchases in their preferred language.
- Seamless SEO
In the competitive realm of SERPs, SEO reserves a front seat. Translating your site into over 10 languages can boost organic traffic by at least 18%, improving your page rankings and conversion rates. Neil Patel’s case highlights a 47% traffic increase by translating a blog into 82 languages, underscoring the impactful connection between multilingualism and SEO success.
- Enhanced Trust and Credibility
Businesses must speak the language of their clients worldwide as it builds trust in them and improves credibility. As human beings, we’re more comfortable conversing in our native language, right? So, the businesses that ensure it are most likely to build an unshakeable bond with their customers globally.
- Creates Brand Image
The multilingual site works as flex and evidence of global business around the world, implying broadness, sophistication, and professionalism. This improves the brand image and reputation among users globally.
Ready to Create a Multilingual WordPress Website?
Expand your reach and boost your brand with our expert multilingual WordPress development.
How to Create Multilingual Websites with WordPress Development Services?
So, how to make a multi-language website in WordPress? Well, you can take advantage of WordPress multilingual plugins, enabling you to reduce the time while taking your website language from English only to multilingual and streamline the process efficiently. Here is the step-by-step guide to that.
Oh, by the way, you may hire dedicated developers for WordPress website development services to smoothly and effectively implement multiple languages in your site.
Step 1: Choose the Domain
The first and foremost step for you is to get a domain name. A domain works as your website’s distinctive address, enabling users to find your online presence through that. Take, for instance, our website’s unique address is, magicminds.io.
Now, how can you get yourself a domain name?
- The best way to buy it is from a registrar, such as GoDaddy.
- Otherwise, you can prefer a hosting provider that comes with a free domain for one year only; after that, to continue, you must pay for it.
Additionally, you must ensure that the domain is clear, simple, crisp, unique, short, and memorable, enabling users to find your site super easily without any hassle.
Step 2: Go for a Hosting Provider
Wait, be cautious, as opting for the wrong hosting service or plan may lead to your site’s slow loading time and, even worse, site crashing.
Fortunately, our extensive research has found the best hosting provider, Bluehost, making it the best hosting solution for WordPress websites, as officially announced by WordPress itself. Sounds amazing, right?
Outperforming its competitors, Bluehost comes at an affordable cost with automated installation and updates, along with the SSL certificate and free domain registration for one year only without any interruption.
Furthermore, Bluehost offers extensive WordPress support, an affordable price range, personalized advanced features, and more, making it the smartest and most effective choice for any organization. However, select the best-suited plan, sign up, and connect the domain to kickstart your WordPress multilingual website building with the help of a WordPress expert.
Step 3: Set the WordPress Website
The fun part begins here. Let’s have a quick look at what things are needed to set up your site.
- Install WordPress
First and foremost, install the WordPress website, without which you can’t even proceed. If you’re tech-savvy, we would recommend you manually install the WordPress website; however, this is a time-consuming process.
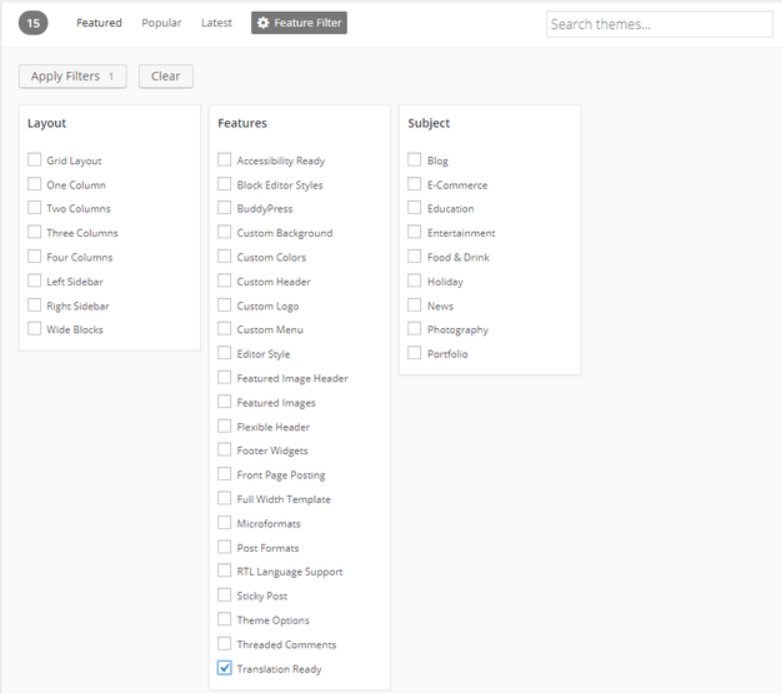
- Themes
It enables you to make your site look aesthetic and stunning. For that, you should go for a translation-ready theme that comes in handy. How can you find a translation-ready theme for your site? Don’t worry; we will guide you through it.
Go to the Feature Filter option from the WordPress Theme Directory and filter out the themes by selecting the translation ready checkbox. It automatically brings the translation-friendly themes, and you can choose from there. Contact a WordPress website development company for building your WordPress website.
- Content
Now, add the content of your site, focusing on your default language for now. You can add any plugin, such as Yoast SEO plugin as per your requirement.
RELATED READ – Features that Make WordPress the Best CMS for SEO
Step 4: Ensure Your Website is WPML Ready
Do some homework before you go ahead with installing the WordPress multilingual plugin. Ensure that your website has the following requirements to make the WPML work after plugin installation.
- Should have WordPress 3.9 or later version
- PHP 5.6 and above version
- MySQL 5.6 or above
- Enable creating tables in the database
- Memory limit should be at least 12MB
- Enable the eval() PHP function.
So, these crucial functionalities should be available for your website to work efficiently. Besides, as we consider you a tech giant, our high recommendation for you is to have a Multibyte String extension to use WPML String Translation. Make sure you have all these to comply.
Step 5: Buy and Download WPML Plugin Easily
Hey, now that you’re all set with your WordPress website, it’s time for you to make the website multilingual. Excited, right? We’re too!
To buy and download the WPML plugin TranslatePress, first visit WPML.org and click the ‘Buy and Download’ option. This will redirect you to the pricing structure page. Now, WPML offers 3 plans: Multilingual Blog, Multilingual CMS, and Multilingual Agency, which comes with a 1-month money return guarantee.
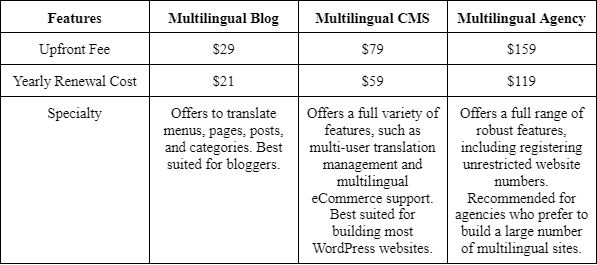
Moreover, you can prefer a Multilingual CMS plan, offering you a compact plan for building multiple language websites. Please note that you can avoid renewing plans every year as this won’t hamper your WPML plugin, only you won’t have access to download items and support systems.
Additionally, after completing the payment part, you can download the plugin and save it as a file for later uploading to the WordPress account.
Install WPML Plugin
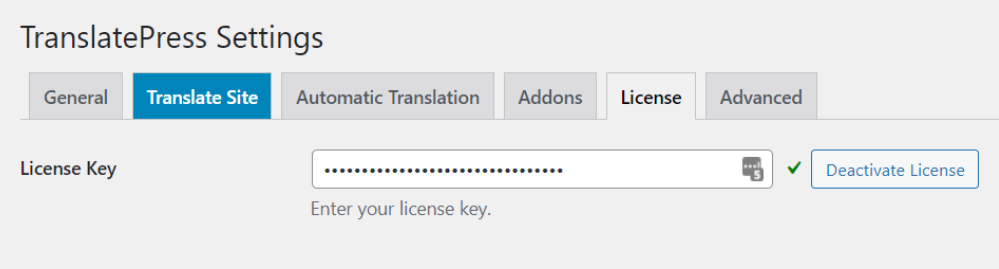
Once you’re done with the above process, it’s time to install the plugin. To do this, head toward the WordPress dashboard, select Add New, and click Upload Plugin from the top of the page. Now, select and upload the WPML file and click Install Now.
Besides, in the dashboard’s Plugins area, choose String Translation, Translation Management, and Media Translation plugins, and activate the license from the dashboard settings. Now, don’t forget to navigate to the license tab, copy the license key from the account page, and click activate the license to complete the process and see the magic!
Step 6: Select Language for WordPress
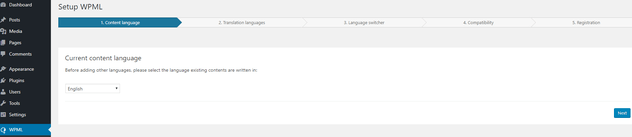
After WPML plugin installation, to offer a myriad of languages on your WordPress website, you must set the default language that reflects the current content language of the site.
After selecting your default language, you can add new languages to your WordPress site. The more language you offer, the more dynamic your site becomes, catering to diverse customers worldwide and making your WordPress site more exclusive. However, this calls for the help of WordPress developers.
To add new languages from the WordPress dashboard, go to Settings and then TranslatePress and select new languages from the drop-down menu.
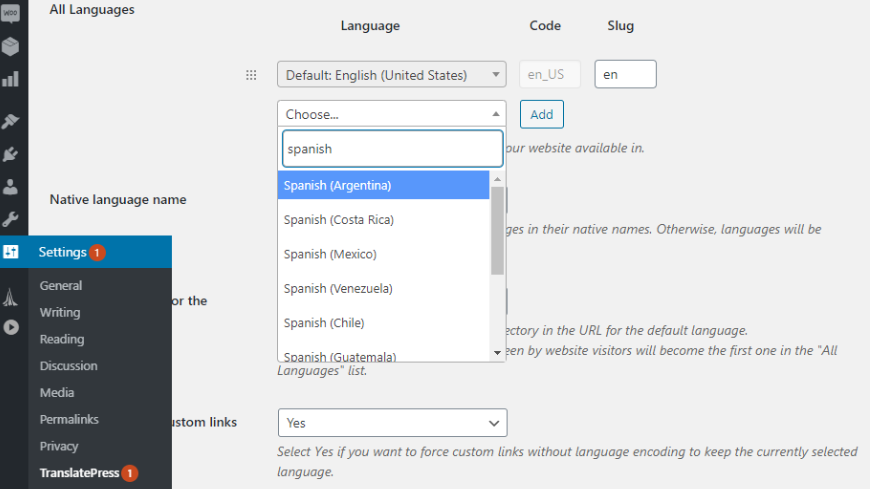
Furthermore, using the language add-on option of the premium version, you can add multiple languages of your choice. After adding as many languages as you want, save the changes, and you’re all set to translate the content.
Remember, if you don’t add any language, you won’t be able to translate the content in that language. So, choose wisely.
Step 7: Translate the Content
Now, don’t be in this misconception that the WPML plugin can automatically translate your WordPress website’s content. For that, you need to take some initiative. So, how can you translate your site’s content?
Well, to do so, you must add a translation of your original content language in the selected language. Take, for instance, your default content language is English, and you want to translate the content into German. Corresponding to the English content, you must enter the translation part in German and click the translation complete box to finish the process, ensuring that you’ve provided the translated content without any failure.
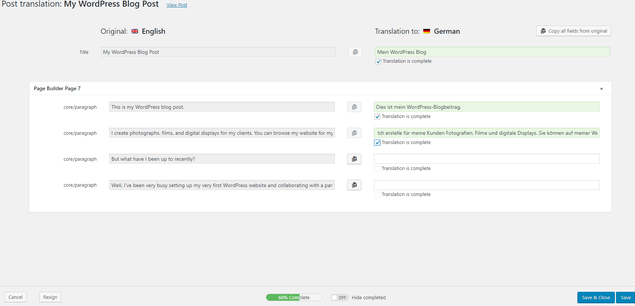
Oh, hold on, does that imply you must enter the translation manually? Don’t worry, not really. If you’re bilingual or trilingual, you can translate the content on your own using your brain power. Other than this, you can take advantage of Google Translate also, simple! Using it, copy and paste the content into the translation page. However, ensure that you double-check the translated content before publishing.
#1 Have the Automatic Translation (Optional)
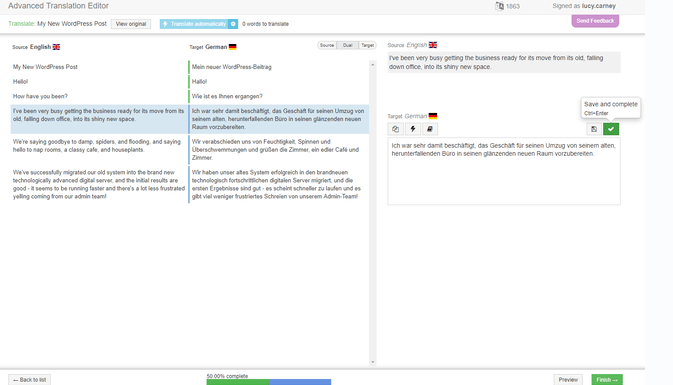
Fortunately, Multilingual CMS and Multilingual Agency plans to offer automated WPML translation processes. This is more like making use of Google Translate, except it translates the content for you without you leaving the site or taking the burden of translation.
Additionally, having automated translation, which is optional, is the fastest, smoothest, and most effective way to translate the content. Your original content language will show up on the left and the translated content on the right side, and you must tick the translation complete box to ensure you’ve not missed any translation.
#2 Outsource Translation
Hiring outsourced or freelance translators is the best choice if you’re facing any issues while translating bigger texts in different languages. So, where can you find them? Fiverr and People Per Hour are great sources for hiring translators worldwide.

WPML also offers a Translation Management service however, please note that these are add-ons, and you must pay extra for these exclusive services. You can hire a dedicated WordPress developer to set up your WordPress website quickly.
ALSO READ – A Complete Guide to WordPress Development Best Practices
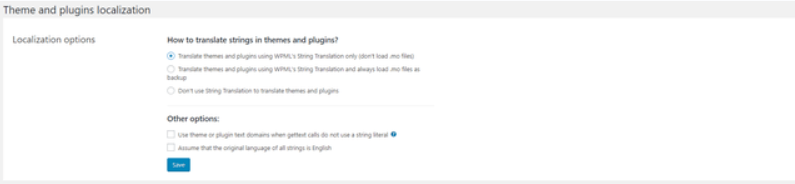
Step 8: Translate the Plugin, Menu, and Theme Strings
Now that you’re done translating the main content, don’t even forget to translate the extra content by mistake, which is grabbing the eye of the visitors. You can visit the Appearance and Menus to translate the menus easily. Although you can tackle and edit the menu section by yourself. We have to have confidence in you. However, translating other features, including themes, plugins, and widgets, is not a piece of cake.
Hey, wait, remember the String Translation plugins we’ve installed previously? Good for you, as we’re going to make use of it now.
From the themes and plugins localization option of the WPML section, you can translate the themes, plugins, and widget content of the site quickly and easily and get one step closer to making a multilingual WordPress website.
Step 9: SEO Translation Power
Done with translating website content? Well, you can’t call it a day yet. To take full advantage of the WordPress multilingual website, you must also translate your site’s metadata. Metadata means the meta description, alt text, tags, page titles, etc, that helps in the SEO of multi-language.
The SEO Pack add-on with any pro license of TranslatePress enables you to translate URL slugs, taxonomy slugs, term slugs, post slugs, Woocommerce slugs, and more, assisting you in securing a higher rank in Google with all the language you’ve added. Once you activate the SEO Pack add-on, launch the String Translation editor to translate the site’s URL, taking care of the XML sitemap and hreflang tags.
Looking for Skilled WordPress Developers?
Experience the power of multilingual WordPress, expertly crafted by our developers. Reach a global audience with ease!
Hire Now!Step 10: Personalize the Language Switcher for Visitors
What’s the point of having a multilingual WordPress website that is not so functional or accessible to your users? It’s meaningless; after all, you’re offering multi-language to cater to a diverse audience, right?
WordPress language switcher is a process through which your users can switch seamlessly from one language to another, which is apparent and offered by your site. It can be either a flag row or a drop-down menu for selecting the language.
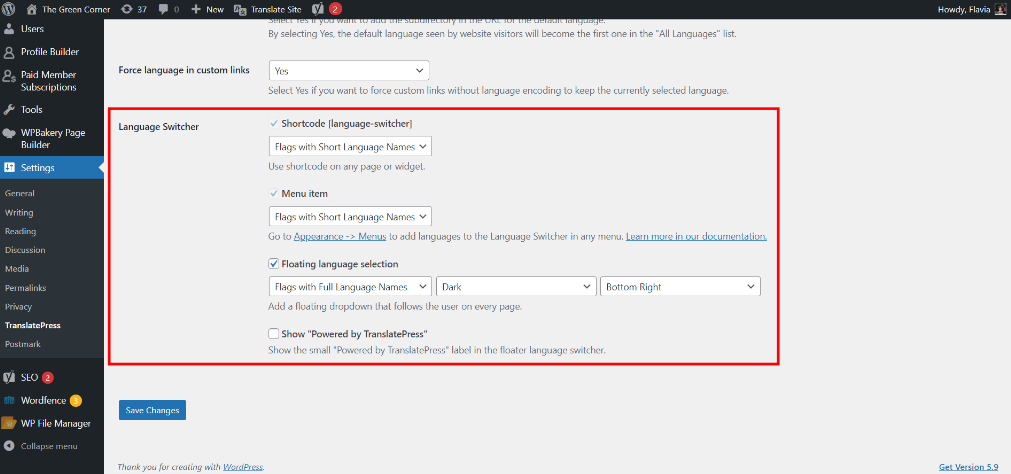
TrnaslatePress empowers you to tailor the language switcher’s looks and functionality by navigating to Settings > TranslatePress > General tab. From there, you can scroll down and come to the language switcher feature along with the below options:
- Shortcode {language switcher} – You can add it virtually anywhere on your site, such as a widget, footer, etc.
- Menu item – It presents the language options inside any menu.
- Floating language selection – It can be used directly to the theme template file on every page the user visits.
More Premium Features (Optional)
TranslatePress’s free version enables a fully functional multilingual WordPress website. However, if you choose the premium version of TranslatePress alongside the SEO Pack add-ons, it provides you access to unlimited language translation and metadata, URLs, etc. Let’s explore the other exclusive features if you upgrade to the premium version.
- Translator Accounts – It enables unique customers to translate your WordPress site’s content without even using the WordPress backend.
- Automatic User Language Detection – This automatically takes the users to their language depending on the IP address or browser settings.
- Browse as User Role – Browse the site as multiple user roles in the editor.
- DeepL Support – This offers automatic translation support (the free version doesn’t support that).
Navigation Based on Language – Instead of translating the existing menu items, it displays multiple menu items depending on the language.
Start Your Multilingual WordPress Development with Magicminds Right Away!
With the right tools, everything is super smooth, right? You also feel the same. That’s why we recommend you use WWWPML plugins with some add-on features to efficiently turn your WordPress website into a multi-language one, spending a dime.
Still concerned how to set up multilingual WordPress? Fret not! Get help from a custom WordPress development company like–Magicminds or hire a WordPress developer to introduce a multilingual option on the site easily.
Get in touch with us, and let’s make your WordPress multilingual setup journey smoother, easier, and quicker. So, happy translating!
Greetings! In the vast online landscape, your WordPress website can say more than just “Hello.” Imagine it resonating with a global audience in Ciao, Hola, Bonjour, Hallo, and Hej. Don’t limit your message to one language; expand your reach and connect with diverse audiences. Well, building a multilingual website with WordPress development services may seem daunting, but fear not. With seasoned WordPress developers and experts, we guide you through seamlessly integrating multiple languages.
This isn’t just about translation plugins; it’s about creating an immersive digital experience for a global audience. It’s time to elevate your online presence, break free from linguistic limitations, and open the doors to a world of business opportunities that transcend borders.
Stay tuned for a comprehensive guide that turns your WordPress website into a multilingual masterpiece. The world is ready to hear your message in every language – let’s make it happen!
The Business Advantages of Multilingual WordPress Development
How to Create Multilingual Websites with WordPress Development Services?
- Step 1: Choose the Domain
- Step 2: Go for a Hosting Provider
- Step 3: Set the WordPress Website
- Step 4: Ensure Your Website is WPML Ready
- Step 5: Buy and Download WPML Plugin Easily
- Step 6: Select Language for WordPress
- Step 7: Translate the Content
- Step 8: Translate the Plugin, Menu, and Theme Strings
- Step 9: SEO Translation Power
- Step 10: Personalize the Language Switcher for Visitors
Get Started with Multilingual WordPress Development Right Away!
The Business Advantages of Multilingual WordPress Development
Why is having a multilingual WordPress website crucial? Here we have deciphered the reasons.
- Enriched User Experience
Multilingual websites enrich user experiences, boosting satisfaction, extending time spent on the site, and minimizing bounce rates. This not only enhances your conversion rate but also ensures a seamless and engaging interaction with diverse audiences.
- Wider Audience Reach
Did you know? 76% of online buyers are more likely to make a purchase when information is presented in their native language. A multilingual website not only enhances customer service but also caters to both domestic and international clients.
In the USA, where Spanish ranks as the 2nd most spoken language, embracing multilingualism is crucial for expanding your business reach.
- Improved Conversion Rate
According to CSA’s ‘Can’t Read, Won’t Buy – B2C‘ report, 72.1% of users prefer spending time on websites in their native language. Failing to provide content in their language may lead foreign customers to leave, significantly impacting your site’s conversion rate.
Implementing a robust multilingual feature not only retains customers but also instills confidence in making purchases in their preferred language.
- Seamless SEO
In the competitive realm of SERPs, SEO reserves a front seat. Translating your site into over 10 languages can boost organic traffic by at least 18%, improving your page rankings and conversion rates. Neil Patel’s case highlights a 47% traffic increase by translating a blog into 82 languages, underscoring the impactful connection between multilingualism and SEO success.
- Enhanced Trust and Credibility
Businesses must speak the language of their clients worldwide as it builds trust in them and improves credibility. As human beings, we’re more comfortable conversing in our native language, right? So, the businesses that ensure it are most likely to build an unshakeable bond with their customers globally.
- Creates Brand Image
The multilingual site works as flex and evidence of global business around the world, implying broadness, sophistication, and professionalism. This improves the brand image and reputation among users globally.
How to Create Multilingual Websites with WordPress Development Services?
So, how to make a multi-language website in WordPress? Well, you can take advantage of WordPress multilingual plugins, enabling you to reduce the time while taking your website language from English only to multilingual and streamline the process efficiently. Here is the step-by-step guide to that.
Oh, by the way, you may hire dedicated developers for WordPress website development services to smoothly and effectively implement multiple languages in your site.
Step 1: Choose the Domain
The first and foremost step for you is to get a domain name. A domain works as your website’s distinctive address, enabling users to find your online presence through that. Take, for instance, our website’s unique address is, magicminds.io.
Now, how can you get yourself a domain name?
- The best way to buy it is from a registrar, such as GoDaddy.
- Otherwise, you can prefer a hosting provider that comes with a free domain for one year only; after that, to continue, you must pay for it.
Additionally, you must ensure that the domain is clear, simple, crisp, unique, short, and memorable, enabling users to find your site super easily without any hassle.
Step 2: Go for a Hosting Provider
Wait, be cautious, as opting for the wrong hosting service or plan may lead to your site’s slow loading time and, even worse, site crashing.
Fortunately, our extensive research has found the best hosting provider, Bluehost, making it the best hosting solution for WordPress websites, as officially announced by WordPress itself. Sounds amazing, right?
Outperforming its competitors, Bluehost comes at an affordable cost with automated installation and updates, along with the SSL certificate and free domain registration for one year only without any interruption.
Furthermore, Bluehost offers extensive WordPress support, an affordable price range, personalized advanced features, and more, making it the smartest and most effective choice for any organization. However, select the best-suited plan, sign up, and connect the domain to kickstart your WordPress multilingual website building with the help of a WordPress expert.
Step 3: Set the WordPress Website
The fun part begins here. Let’s have a quick look at what things are needed to set up your site.
- Install WordPress
First and foremost, install the WordPress website, without which you can’t even proceed. If you’re tech-savvy, we would recommend you manually install the WordPress website; however, this is a time-consuming process.
- Themes
It enables you to make your site look aesthetic and stunning. For that, you should go for a translation-ready theme that comes in handy. How can you find a translation-ready theme for your site? Don’t worry; we will guide you through it.
Go to the Feature Filter option from the WordPress Theme Directory and filter out the themes by selecting the translation ready checkbox. It automatically brings the translation-friendly themes, and you can choose from there. Contact a WordPress website development company for building your WordPress website.
- Content
Now, add the content of your site, focusing on your default language for now. You can add any plugin, such as Yoast SEO plugin as per your requirement.
Step 4: Ensure Your Website is WPML Ready
Do some homework before you go ahead with installing the WordPress multilingual plugin. Ensure that your website has the following requirements to make the WPML work after plugin installation.
- Should have WordPress 3.9 or later version
- PHP 5.6 and above version
- MySQL 5.6 or above
- Enable creating tables in the database
- Memory limit should be at least 12MB
- Enable the eval() PHP function.
So, these crucial functionalities should be available for your website to work efficiently. Besides, as we consider you a tech giant, our high recommendation for you is to have a Multibyte String extension to use WPML String Translation. Make sure you have all these to comply.
Step 5: Buy and Download WPML Plugin Easily
Hey, now that you’re all set with your WordPress website, it’s time for you to make the website multilingual. Excited, right? We’re too!
To buy and download the WPML plugin TranslatePress, first visit WPML.org and click the ‘Buy and Download’ option. This will redirect you to the pricing structure page. Now, WPML offers 3 plans: Multilingual Blog, Multilingual CMS, and Multilingual Agency, which comes with a 1-month money return guarantee.
Moreover, you can prefer a Multilingual CMS plan, offering you a compact plan for building multiple language websites. Please note that you can avoid renewing plans every year as this won’t hamper your WPML plugin, only you won’t have access to download items and support systems.
Additionally, after completing the payment part, you can download the plugin and save it as a file for later uploading to the WordPress account.
Install WPML Plugin
Once you’re done with the above process, it’s time to install the plugin. To do this, head toward the WordPress dashboard, select Add New, and click Upload Plugin from the top of the page. Now, select and upload the WPML file and click Install Now.
Besides, in the dashboard’s Plugins area, choose String Translation, Translation Management, and Media Translation plugins, and activate the license from the dashboard settings. Now, don’t forget to navigate to the license tab, copy the license key from the account page, and click activate the license to complete the process and see the magic!
Step 6: Select Language for WordPress
After WPML plugin installation, to offer a myriad of languages on your WordPress website, you must set the default language that reflects the current content language of the site.
After selecting your default language, you can add new languages to your WordPress site. The more language you offer, the more dynamic your site becomes, catering to diverse customers worldwide and making your WordPress site more exclusive. However, this calls for the help of WordPress developers.
To add new languages from the WordPress dashboard, go to Settings and then TranslatePress and select new languages from the drop-down menu.
Furthermore, using the language add-on option of the premium version, you can add multiple languages of your choice. After adding as many languages as you want, save the changes, and you’re all set to translate the content.
Remember, if you don’t add any language, you won’t be able to translate the content in that language. So, choose wisely.
Step 7: Translate the Content
Now, don’t be in this misconception that the WPML plugin can automatically translate your WordPress website’s content. For that, you need to take some initiative. So, how can you translate your site’s content?
Well, to do so, you must add a translation of your original content language in the selected language. Take, for instance, your default content language is English, and you want to translate the content into German. Corresponding to the English content, you must enter the translation part in German and click the translation complete box to finish the process, ensuring that you’ve provided the translated content without any failure.
Oh, hold on, does that imply you must enter the translation manually? Don’t worry, not really. If you’re bilingual or trilingual, you can translate the content on your own using your brain power. Other than this, you can take advantage of Google Translate also, simple! Using it, copy and paste the content into the translation page. However, ensure that you double-check the translated content before publishing.
Have the Automatic Translation (Optional)
Fortunately, Multilingual CMS and Multilingual Agency plans to offer automated WPML translation processes. This is more like making use of Google Translate, except it translates the content for you without you leaving the site or taking the burden of translation.
Additionally, having automated translation, which is optional, is the fastest, smoothest, and most effective way to translate the content. Your original content language will show up on the left and the translated content on the right side, and you must tick the translation complete box to ensure you’ve not missed any translation.
Outsource Translation
Hiring outsourced or freelance translators is the best choice if you’re facing any issues while translating bigger texts in different languages. So, where can you find them? Fiverr and People Per Hour are great sources for hiring translators worldwide.
WPML also offers a Translation Management service however, please note that these are add-ons, and you must pay extra for these exclusive services. You can hire a dedicated WordPress developer to set up your WordPress website quickly.
Step 8: Translate the Plugin, Menu, and Theme Strings
Now that you’re done translating the main content, don’t even forget to translate the extra content by mistake, which is grabbing the eye of the visitors. You can visit the Appearance and Menus to translate the menus easily. Although you can tackle and edit the menu section by yourself. We have to have confidence in you. However, translating other features, including themes, plugins, and widgets, is not a piece of cake.
Hey, wait, remember the String Translation plugins we’ve installed previously? Good for you, as we’re going to make use of it now.
From the themes and plugins localization option of the WPML section, you can translate the themes, plugins, and widget content of the site quickly and easily and get one step closer to making a multilingual WordPress website.
Step 9: SEO Translation Power
Done with translating website content? Well, you can’t call it a day yet. To take full advantage of the WordPress multilingual website, you must also translate your site’s metadata. Metadata means the meta description, alt text, tags, page titles, etc, that helps in the SEO of multi-language.
The SEO Pack add-on with any pro license of TranslatePress enables you to translate URL slugs, taxonomy slugs, term slugs, post slugs, Woocommerce slugs, and more, assisting you in securing a higher rank in Google with all the language you’ve added. Once you activate the SEO Pack add-on, launch the String Translation editor to translate the site’s URL, taking care of the XML sitemap and hreflang tags.
Step 10: Personalize the Language Switcher for Visitors
What’s the point of having a multilingual WordPress website that is not so functional or accessible to your users? It’s meaningless; after all, you’re offering multi-language to cater to a diverse audience, right?
WordPress language switcher is a process through which your users can switch seamlessly from one language to another, which is apparent and offered by your site. It can be either a flag row or a drop-down menu for selecting the language.
TrnaslatePress empowers you to tailor the language switcher’s looks and functionality by navigating to Settings > TranslatePress > General tab. From there, you can scroll down and come to the language switcher feature along with the below options:
- Shortcode {language switcher} – You can add it virtually anywhere on your site, such as a widget, footer, etc.
- Menu item – It presents the language options inside any menu.
- Floating language selection – It can be used directly to the theme template file on every page the user visits.
More Premium Features (Optional)
TranslatePress’s free version enables a fully functional multilingual WordPress website. However, if you choose the premium version of TranslatePress alongside the SEO Pack add-ons, it provides you access to unlimited language translation and metadata, URLs, etc. Let’s explore the other exclusive features if you upgrade to the premium version.
- Translator Accounts – It enables unique customers to translate your WordPress site’s content without even using the WordPress backend.
- Automatic User Language Detection – This automatically takes the users to their language depending on the IP address or browser settings.
- Browse as User Role – Browse the site as multiple user roles in the editor.
- DeepL Support – This offers automatic translation support (the free version doesn’t support that).
Navigation Based on Language – Instead of translating the existing menu items, it displays multiple menu items depending on the language.
Get Started with Multilingual WordPress Development Right Away!
With the right tools, everything is super smooth, right? You also feel the same. That’s why we’re recommending you use WWWPML plugins with some add-on features to efficiently turn your WordPress website into a multi-language website, spending a dime. Now, you can get help from a custom WordPress development company like us or hire a WordPress developer to introduce a multilingual option on the site easily. So, happy translating!